How to Make Simple Baby Blanket With a Boarder
Get The
Free Coffee E-Book!
Success! Now check your email to confirm your subscription and grab your FREE coffee e-book!

Hey there Grant Life friends! It's Michaela from Covered in Mod Podge again. I'm here today to share a tutorial for a fun baby blanket. This blanket features a big border and is perfect for showing off two fun fabrics!

Want to make your own? You'll need:
1 1/4 yd of flannel
1 yd of contrasting flannel
Contrasting thread
Rotary cutter/mat
Start out by cutting your back fabric to 42 by 42 inches. Then, cut your front fabric to 32 by 32 inches. You can honestly make this blanket any sized. I like the look of a very thick border. Therefore, I make my back fabric 10 inches larger than my front fabric.

Find a large, clean work space. Lay your back fabric down, right side up.

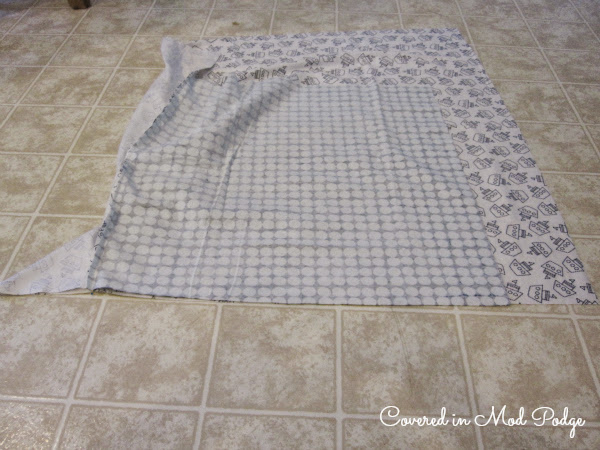
Then, put your front fabric on top, right side down. You'll want to center your fabric on the edge of one side. So, you'll have five inches of back fabric on each side of your front fabric.
Sew along this edge, using your presser foot your seam allowance guide. Start and stop your seam 1/4 inch from the beginning and then end. Back stitch at the beginning and end of your seam.

Now you'll move your blanket back to the ground. Its time to center your front fabric along the edge of the next side of your back fabric. You'll again have five inches on either side of your front fabric. This will form a triangle of your back fabric on the side where you had sewn along the other edge.

Sew again, starting and stopping leaving 1/4 inch on each side.

Continue on the same way with your third side. On your fourth side, make sure you leave a 5 inch gap in the middle for turning.

Alright, now its time to get rid of all that excess fabric floating around. You'll do this by cutting off the fabric at the corners. Start by making a triangle with the excess back fabric on one corner.

Fold the tip of the triangle down to the edge where your front fabric is.

Cut along the fold. Now sew along the open edge you just create.

Repeat for all four corners.
Go ahead and turn your blanket. Press well, making sure to turn in the fabric from your turning gap.

When you turn your blanket, make sure your corners are pushed out all the way.
Now, top stitch along the seam between the front and back fabrics. Make sure you're careful to close the gap you left for turning the blanket.

Once you get the hang of this blanket, you'll easily be able to make it in 30 minutes, cutting included!

Use your scraps for a bow and you have a simple, affordable baby gift!

Love this post? Check out the other amazing things Michaela has made!


Like it? PIN IT!

- Author
- Recent Posts
Michaela is a California girl living in Texas with her husband and nineteen month old daughter. She is a MSW student currently interning with a large, urban school district. Between interning, school work, and a ball of energytoddler, she tries to find a little time to sew and craft. You can find her exploits in crafting, sewing, cooking, and being a mom at coveredinmodpodge.blogspot.com.
How to Make Simple Baby Blanket With a Boarder
Source: https://mommakesdinner.com/big-border-baby-blanket-tutorial/
0 Response to "How to Make Simple Baby Blanket With a Boarder"
Post a Comment